How to Change a Mountain Bike Tire: A Simple Step-by-Step Guide
Key Takeaways
- Changing a mountain bike tire is a manageable DIY task requiring basic tools like tire levers, a pump, and a patch kit.
- Properly deflate the tire and remove the wheel carefully to avoid damage to the bike’s components.
- Use tire levers to loosen and remove the old tire, then inspect and prepare the new tire and tube before installation.
- Ensure the tire bead seats evenly on the rim and inflate to the recommended pressure, typically 25-35 psi.
- Reinstall the wheel securely, align it properly, and check brake function before riding.
- Regular tire maintenance, including pressure checks, cleaning, and inspection, extends tire life and enhances safety.
Changing a mountain bike tire might seem tricky at first, but once you know the steps, it’s a straightforward task you can handle on your own. Whether you’ve hit a sharp rock or just need to replace a worn-out tire, learning this skill saves you time and keeps you riding without interruptions.
You don’t need fancy tools or a mechanic’s help to get the job done. With a few basic tools and some simple techniques, you’ll be back on the trail in no time. Let’s dive into how you can change your mountain bike tire quickly and confidently.
Tools and Materials Needed
Changing a mountain bike tire requires a small set of tools and the right replacement tire. Having these prepared makes the process quicker and smoother.
Essential Tools for Tire Removal
Prepare these tools before starting:
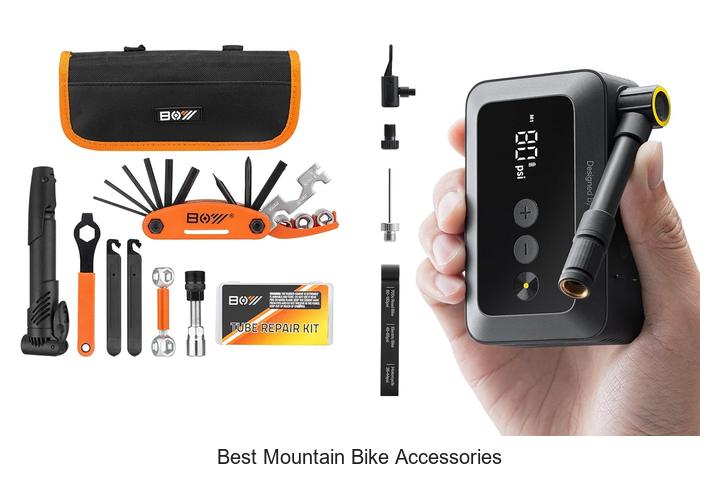
- Tire levers, usually two or three, to pry the tire away from the rim without damage.
- A portable bike pump or CO2 inflator to reinflate the tire after installation.
- A patch kit or spare inner tube, in case the current tube is punctured.
- A valve core remover, if you need to deflate tubeless tires completely.
- Optional gloves to protect your hands and a wrench if your bike uses bolt-on wheels.
Choosing the Right Replacement Tire
- Check the tire size, typically marked on the sidewall (e.g., 29 x 2.3 inches).
- Match the tread pattern to your riding terrain, such as knobby tires for off-road trails.
- Ensure compatibility with your rim width and bike type to maintain performance and safety.
- Consider tire type—tubeless or tube—with tubeless offering fewer flats but requiring compatible rims.
Preparing the Bike for Tire Change
Preparing your mountain bike properly sets the stage for an efficient tire change. Follow these steps to ready the bike and avoid complications during the process.
Deflating the Tire Completely
Start by releasing all air from the tire. Open the valve cap and press the valve core to let the air escape. For Presta valves, unscrew the small locknut before pressing. For Schrader valves, firmly press the center pin. Ensure the tire is fully deflated; any remaining air can make removing the tire difficult. Use a valve core remover if necessary to speed up deflation on tubeless setups.
Removing the Wheel from the Bike
Next, focus on detaching the wheel. Shift to the smallest rear cog on your drivetrain to reduce tension if removing the rear wheel. For quick-release axles, open the lever and loosen the nut opposite it before pulling the wheel out. For bolt-on wheels, use a wrench to loosen the nuts completely. Always support the bike frame securely so it doesn’t tip while the wheel is off. Remove the wheel carefully to prevent damage to the brake rotors or frame.
Removing the Old Tire
Removing the old tire prepares your wheel for the new one. Follow these steps to loosen the tire bead and detach the tire from the rim efficiently.
Loosening the Tire Bead
Start by pressing down on the tire sidewall with your hands to break the bead’s seal against the rim. Work your fingers around the tire to loosen the bead evenly on both sides. If the bead feels stuck, you can push the tire’s edge toward the center of the rim’s well to create slack. This action eases bead removal and prevents rim damage during the next step.
Using Tire Levers for Removal
Insert a tire lever under the loosened bead opposite the valve stem. Pry the bead over the rim edge, then hook the lever onto a spoke to hold it in place. Use a second lever two to three inches away from the first to continue prying the bead off the rim. Slide the lever around the wheel’s circumference to fully detach one side of the tire. Once one side clears the rim, pull the rest of the tire and tube free by hand.
Installing the New Tire
Installing the new tire involves inspecting key components and ensuring proper alignment for safe, efficient riding. Detailed attention to the tube and tire condition, along with correctly seating the tire on the rim, enhances performance and prevents common issues like flats or tire blowouts.
Checking the Tube and Tire Condition
Inspect the inner tube for punctures, holes, or weak spots by inflating it slightly and listening for escaping air or submerging it in water to spot bubbles. Replace the tube if any damage appears. Examine the new tire for manufacturing defects, such as cuts or irregular tread patterns, and verify compatibility with your rim size and bike type. Removing debris embedded in the tire tread prevents future punctures and maintains traction.
Properly Seating the Tire on the Rim
Begin by partially inflating the tube to give it shape, avoiding over-inflation that may cause pinching. Position the tube inside the tire, aligning the valve stem with the rim hole. Fit one side of the tire onto the rim completely, then work the opposite bead over the rim edge using your hands; avoid tire levers, which can damage the tube. Check that the tire beads sit evenly inside the rim bed without folds or pinches. Inflate the tire gradually while spinning the wheel to help the bead settle uniformly, and confirm the tire holds consistent shape and pressure before reinstalling the wheel.
Inflating and Reinstalling the Wheel
Proper inflation and secure wheel reinstallation ensure optimal performance and safety after changing a mountain bike tire.
Inflating to the Correct Pressure
Inflate the tire gradually, checking the pressure with a reliable gauge to match the manufacturer’s recommended range. Use a floor pump or CO2 inflator for consistent results. Inflate the tire to between 25 and 35 psi for typical mountain bike riding, adjusting based on terrain and rider weight. Avoid overinflating, which risks blowouts, and underinflating, which reduces control and increases pinch flats. Spin the wheel during inflation to ensure the tire bead seats evenly and check for any bulges or gaps.
Reattaching the Wheel to the Bike
Align the wheel with the dropouts, making sure the axle seats fully into the frame or fork. If your bike has disc brakes, position the rotor between the brake pads carefully to avoid rubbing. Secure the axle using the quick-release lever or tighten the axle nuts evenly using the correct wrench. Check that the wheel is centered and spins freely without wobbling. Reconnect any disconnected brake or derailleur components. Finally, test the bike by spinning the wheel and engaging the brakes to confirm proper installation.
Tips for Maintaining Your Mountain Bike Tires
Inspect your tires before every ride for cuts, punctures, or worn tread that could affect traction and safety. Clean your tires regularly using a brush and mild soap to remove dirt and debris that cause premature wear.
Maintain proper tire pressure by checking it with a reliable gauge before each ride, keeping it within the recommended range of 25 to 35 psi for most mountain bike tires. Rotate your tires periodically if you use a front and rear tire with different tread patterns to ensure even wear and extend their lifespan.
Store your bike in a cool, dry place away from direct sunlight, which can cause rubber to dry out and crack. Replace tires promptly if you notice signs of significant wear, sidewall damage, or frequent flats, as these can compromise your bike’s performance and safety.
Conclusion
Mastering how to change a mountain bike tire puts you in control of your ride and helps you avoid unnecessary delays. With just a few tools and some practice, you can handle flats confidently and get back on the trail faster. Keeping your tires in good shape not only improves performance but also extends their lifespan, saving you money and hassle.
By taking the time to learn this skill, you’re investing in your biking independence and safety. So next time you face a flat, you’ll know exactly what to do—no stress, no waiting, just smooth riding ahead.
